Language Switcher
ONLINE MANUALver. 1.23

How To Operate

Tracking Points

Here, we will set the point of “reading barcodes and recording information”.

Configuring Tracking Points

(1) In “Tracking Point Name”, Aenter the name of the point to be tracked (location/work/state, etc.).
    By default, “Node” is displayed, but you can change it to an arbitrary and meaningful name.
    You can add points with “+Tracking Point” B in the upper right corner of the screen.
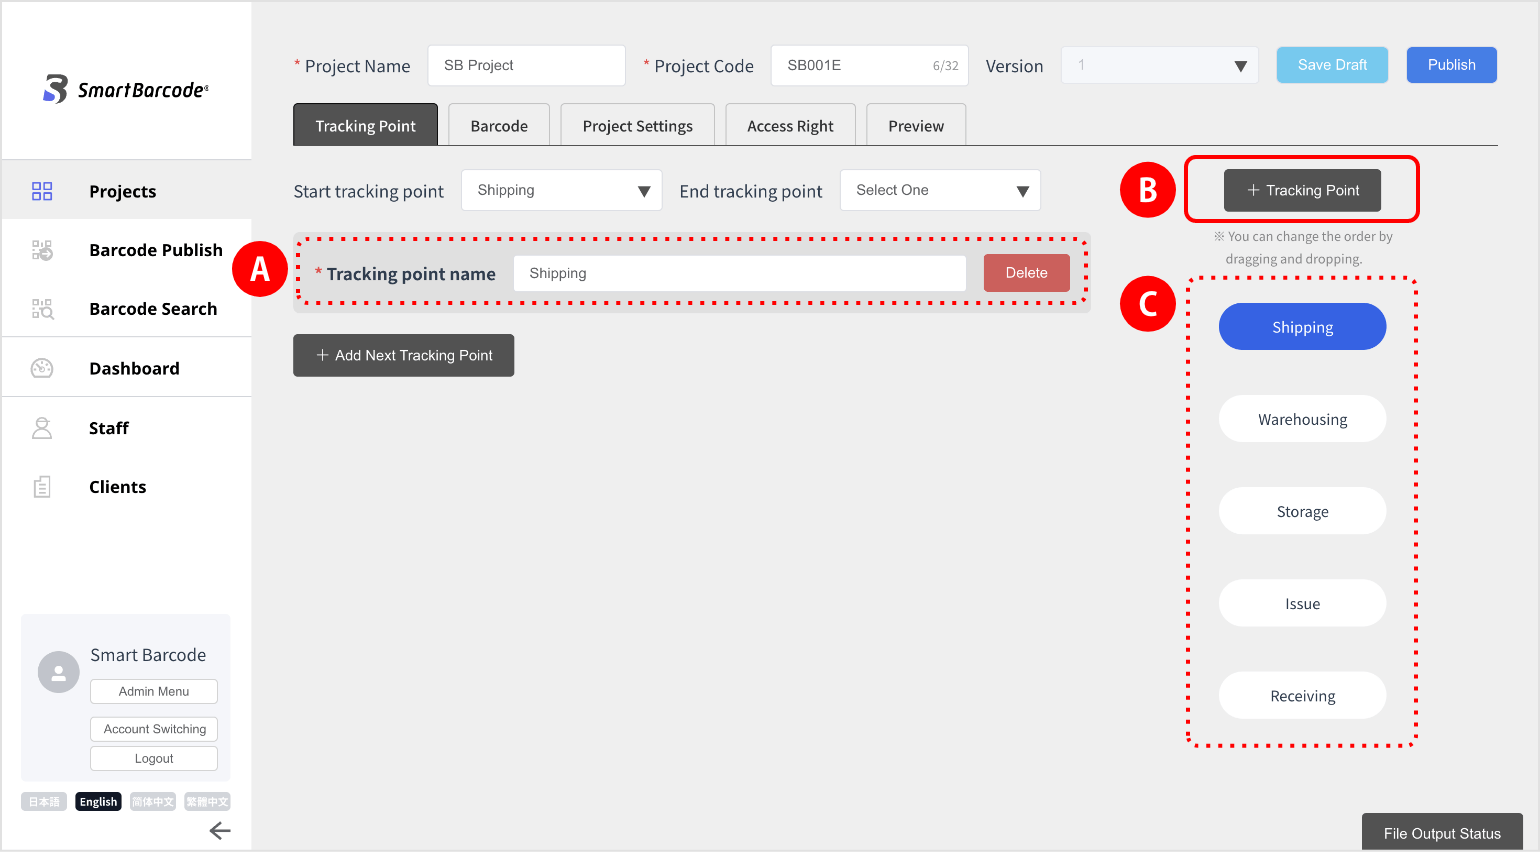
– Example: using logistics trace as an example, we set 5 tracking points.C
  Shipping, receiving, storage, sending, and receiving

Hints
In the flowchart on the right side of the screen, they are arranged in the order in which they were added, but you can change the order by dragging and dropping. If you want to change the order, do so before “connect tracking points“. You can do it after connecting, but please note that you will need to reconfigure the information to be connected/recorded.

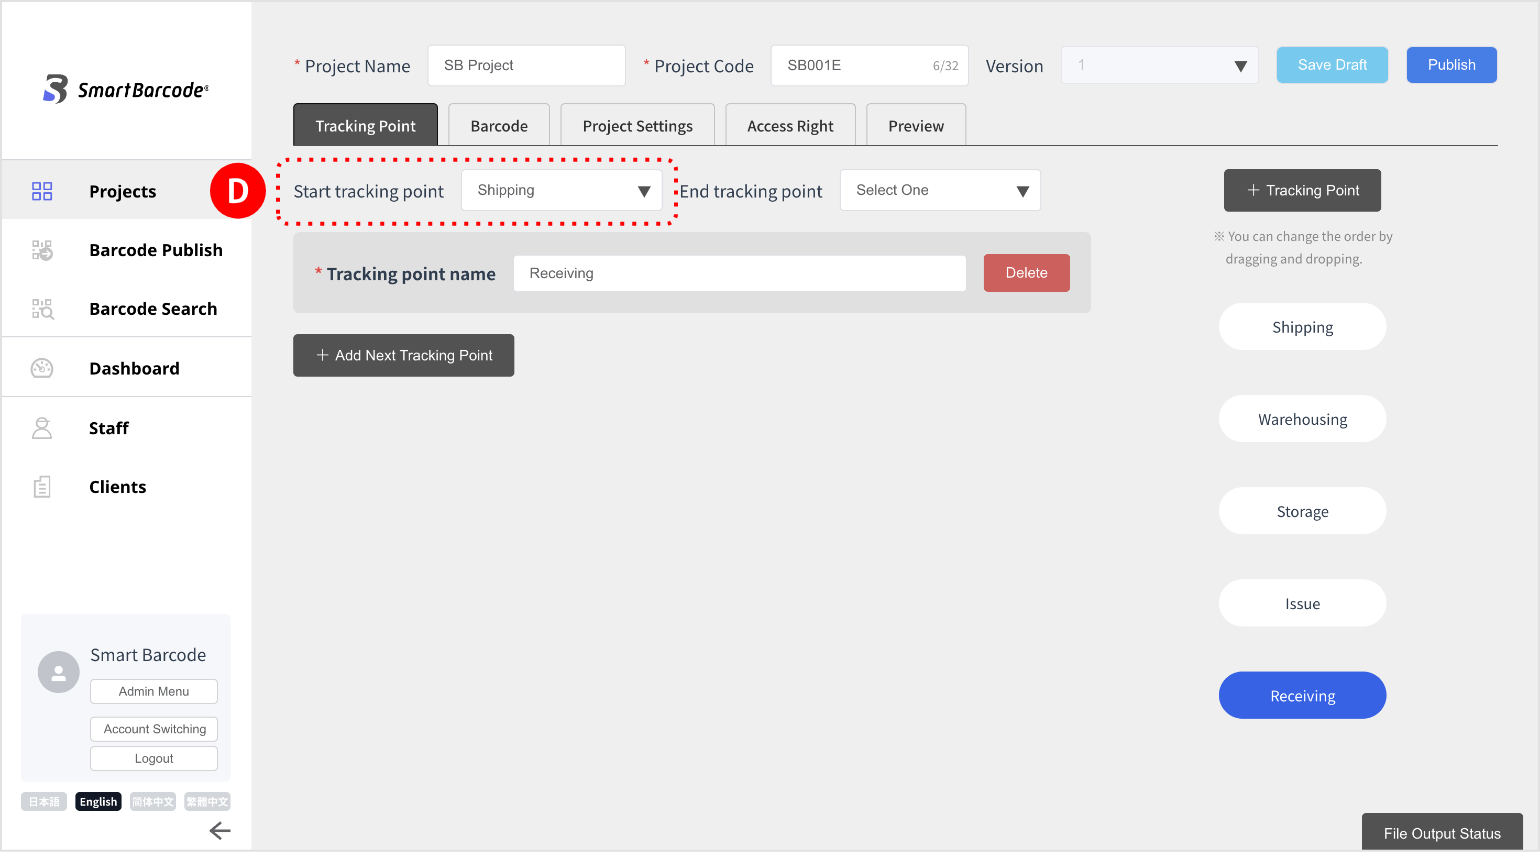
(2) Set the point at which you want to start tracking in “Start tracking point”.D
    By default, the first “Tracking Point” (Node 1) set is displayed as the “Start tracking point”, but you can change it.
Connecting Tracking Points

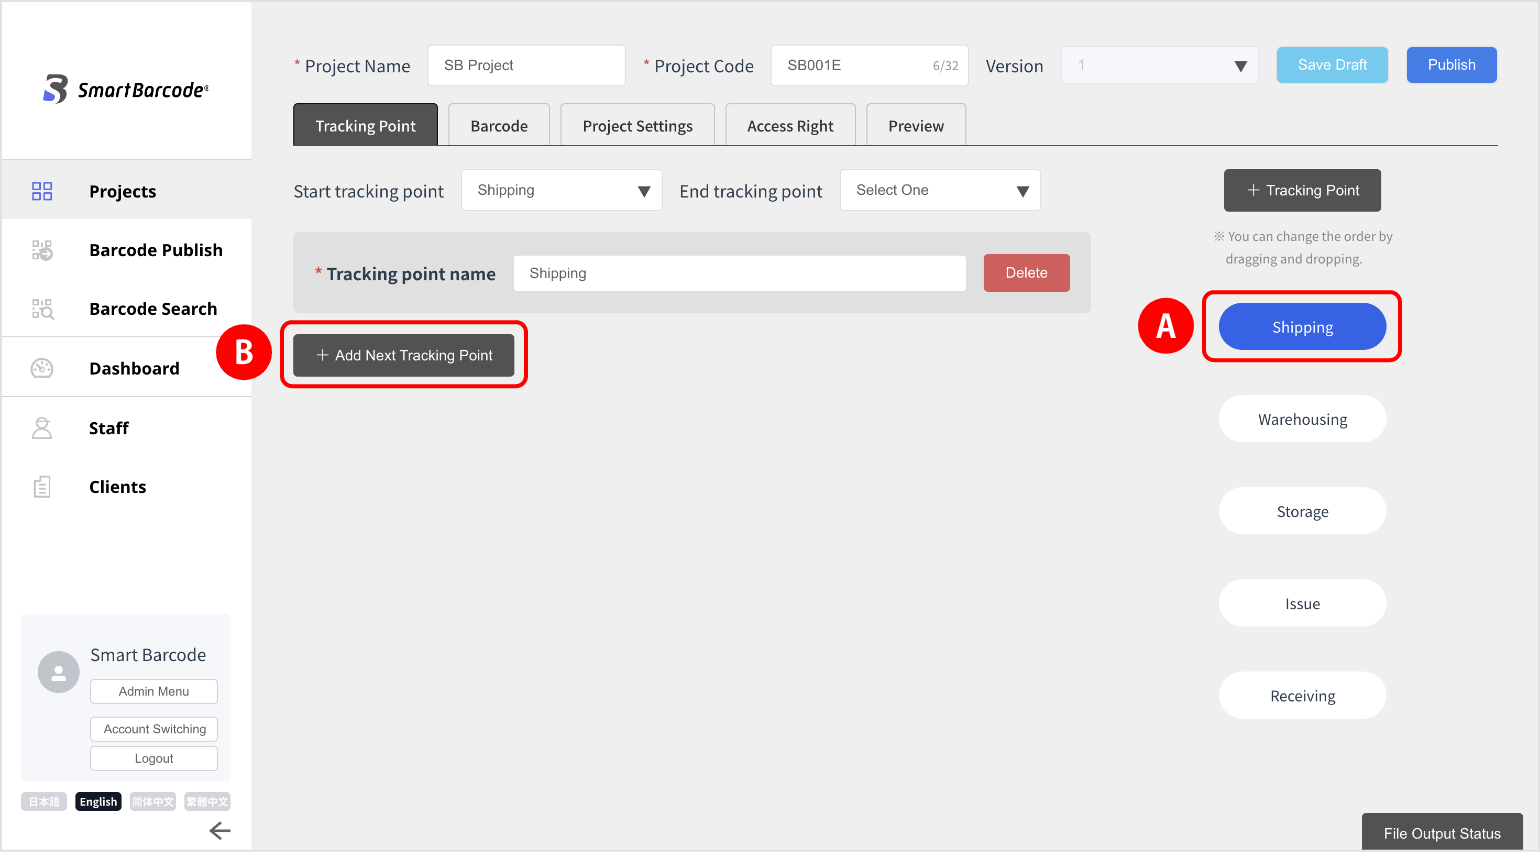
Connect the configured tracking points sequentially to confirm the overall flow of the trace.

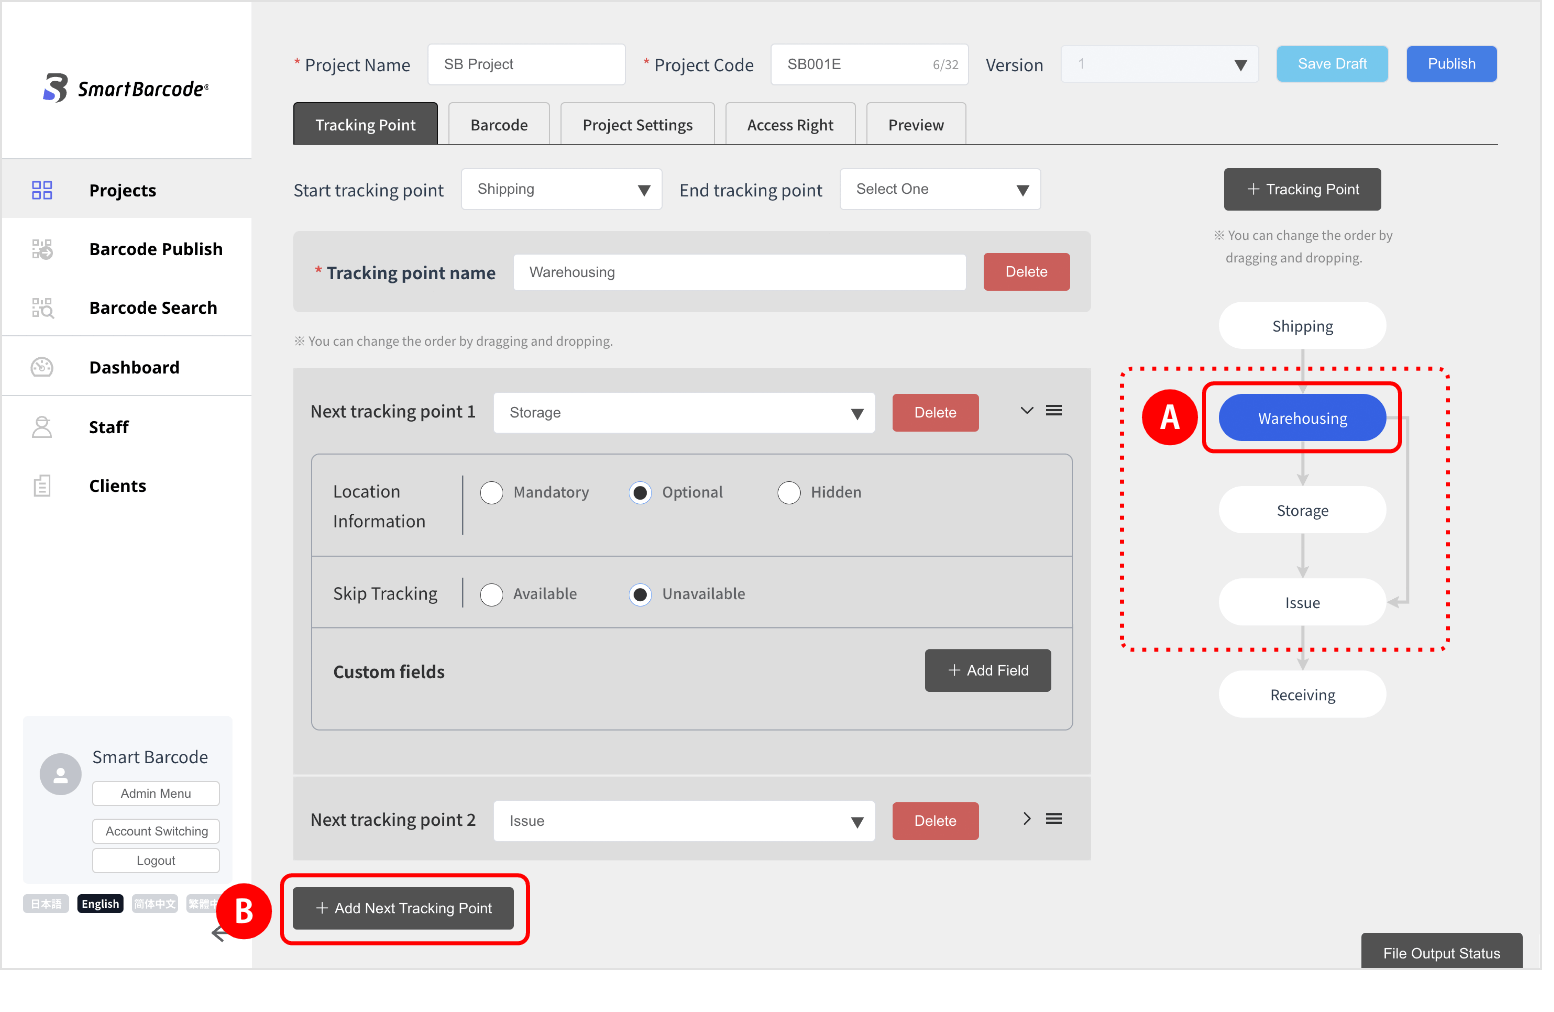
(1) Select a tracking point.A
(2) Select the tracking point you want to connect to with “+Add Next Tracking Point”.B

Caution

If you do not want to branch the connection, select a new tracking point from the flowchart on the right side of the screen, then add it with “+ Add Next Tracking Point”.
(branching is described in the next section.) 

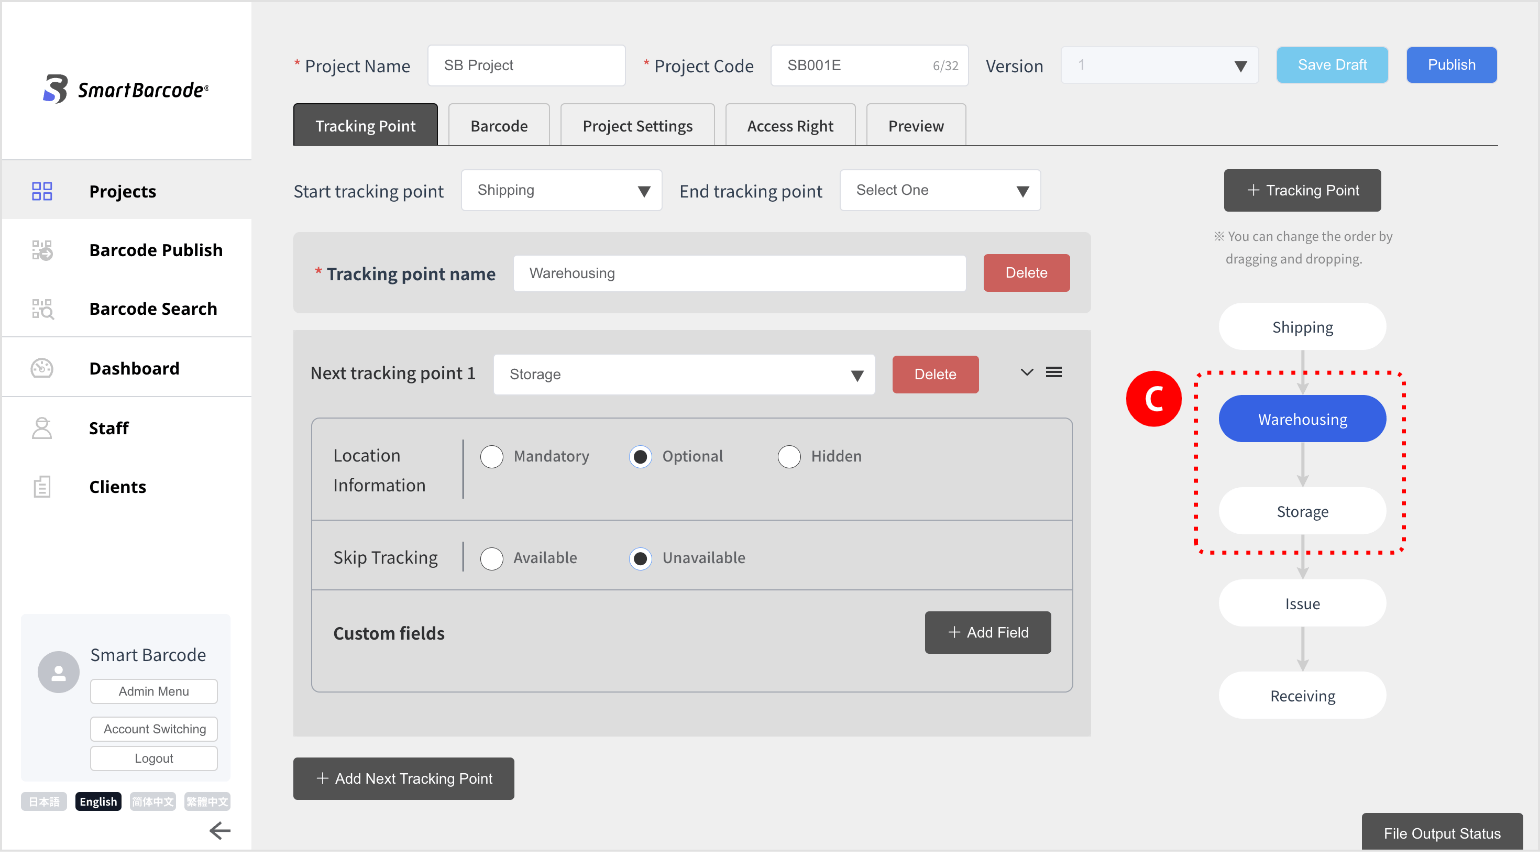
(3) When tracking points are connected, arrows are displayed between the tracking points.C
Example: Five tracking points were connected. Shipping → Receiving → Storage → Dispatch → Receipt

Tracking Point Branching

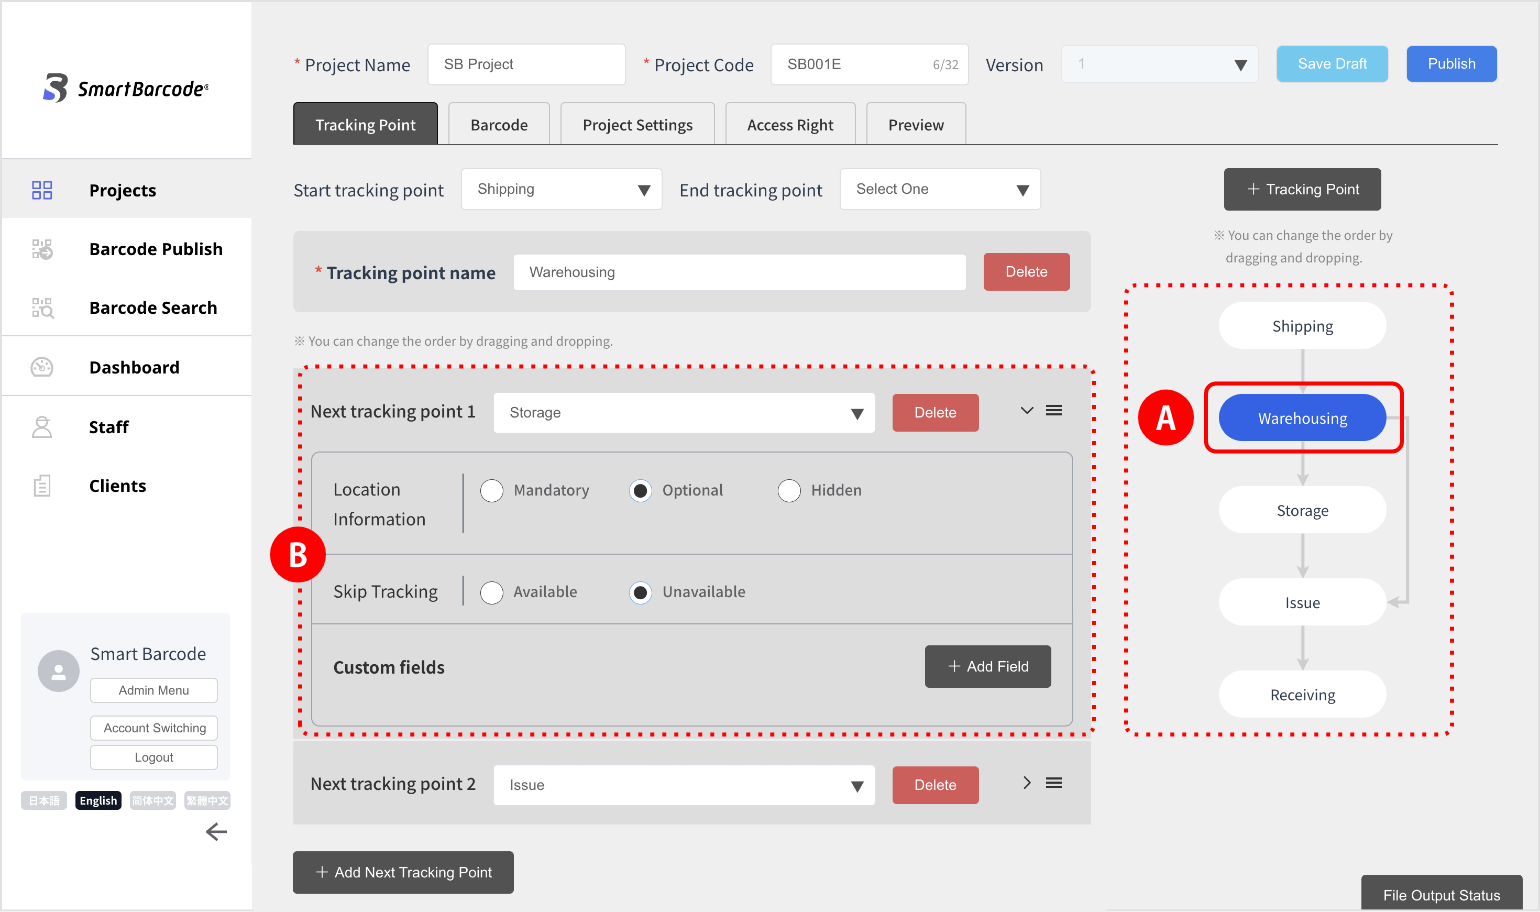
You can branch one tracking point to connect to multiple different tracking points.
(1) Select the tracking point.A
(2) Select the next tracking point by clicking “+ Add Next Tracking Point.”B
If there are multiple branches, use the “+ Add Next Tracking Point” to increase the number of branches.
Example: When a received product is partially “stored” and partially “dispatched,” here is an example of how branching would work.

Set “Recorded Items” for Tracking Points

You can configure the recorded items for each tracking point.
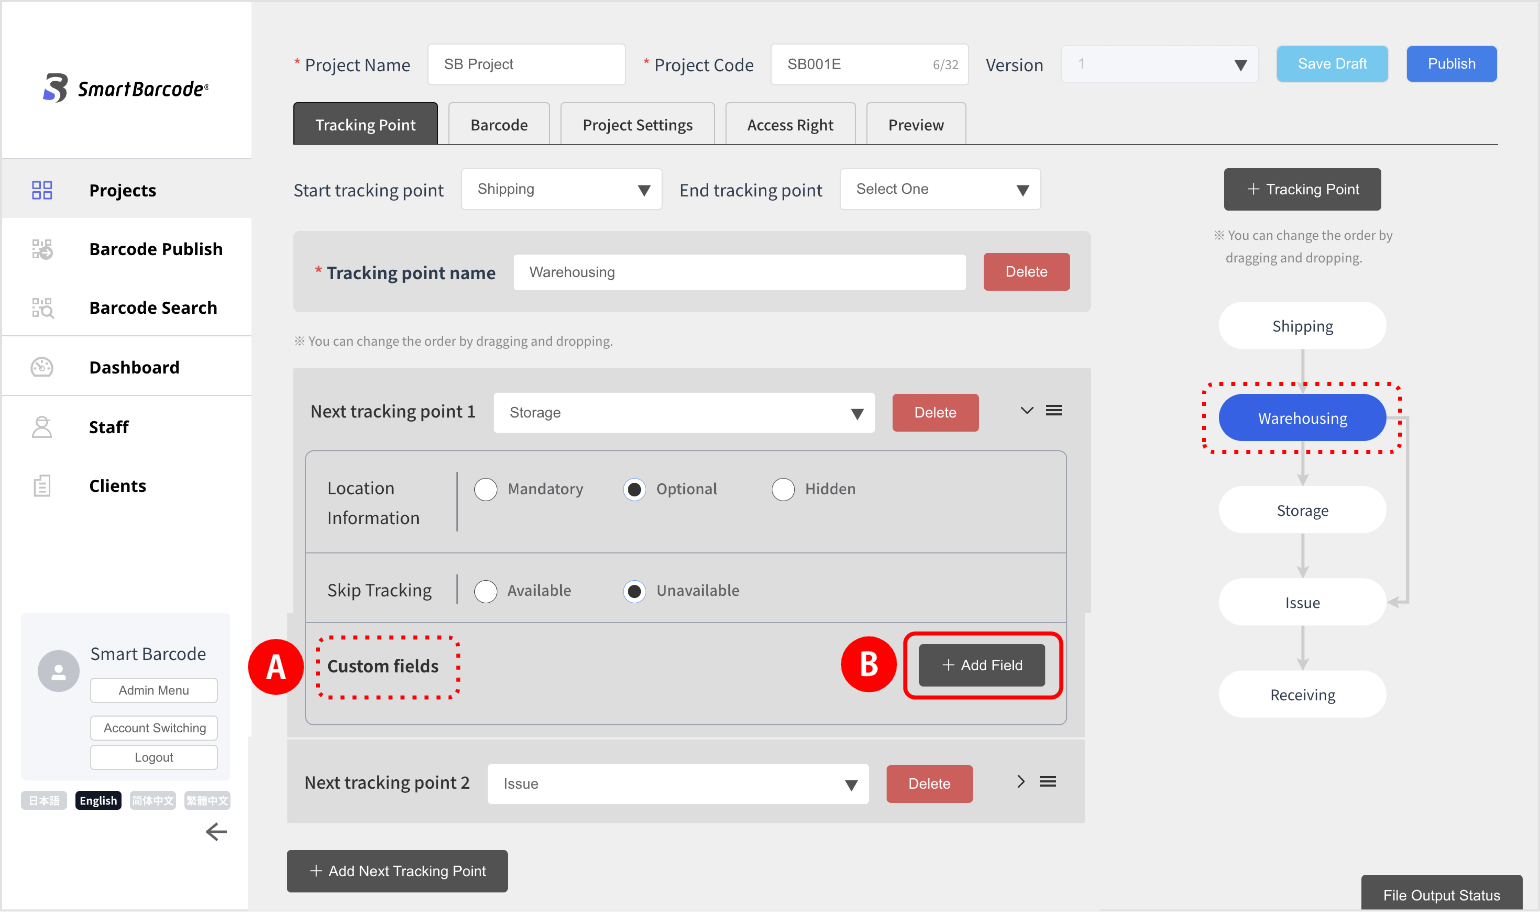
(1) Select the tracking point from the flowchart Aon the right.
(2) Under “Next Tracking Point,” you will see “Location Information”B“Skip Tracking”Band
“Set Recorded Items”B

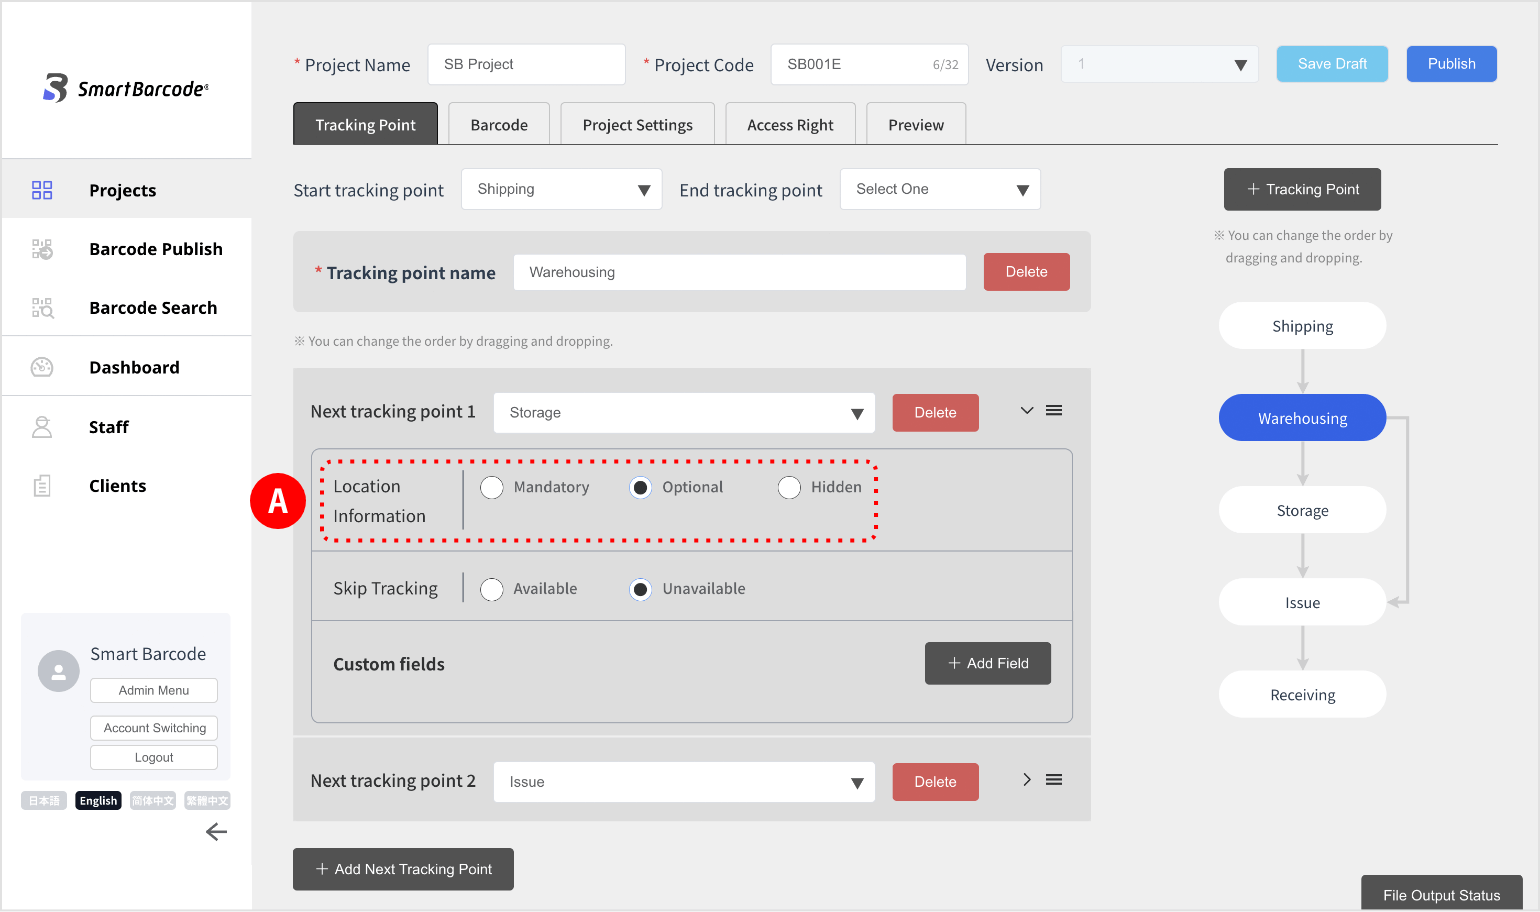
Location Information

You can set the tracking point’s location information to be automatically captured and displayed on Google Maps.
(1) Set location acquisition (Required / Optional / Don’t acquire).A
*Note: If set to “Required,” ensure that the device’s location services are turned on.

Tracking won’t complete if location services are off.
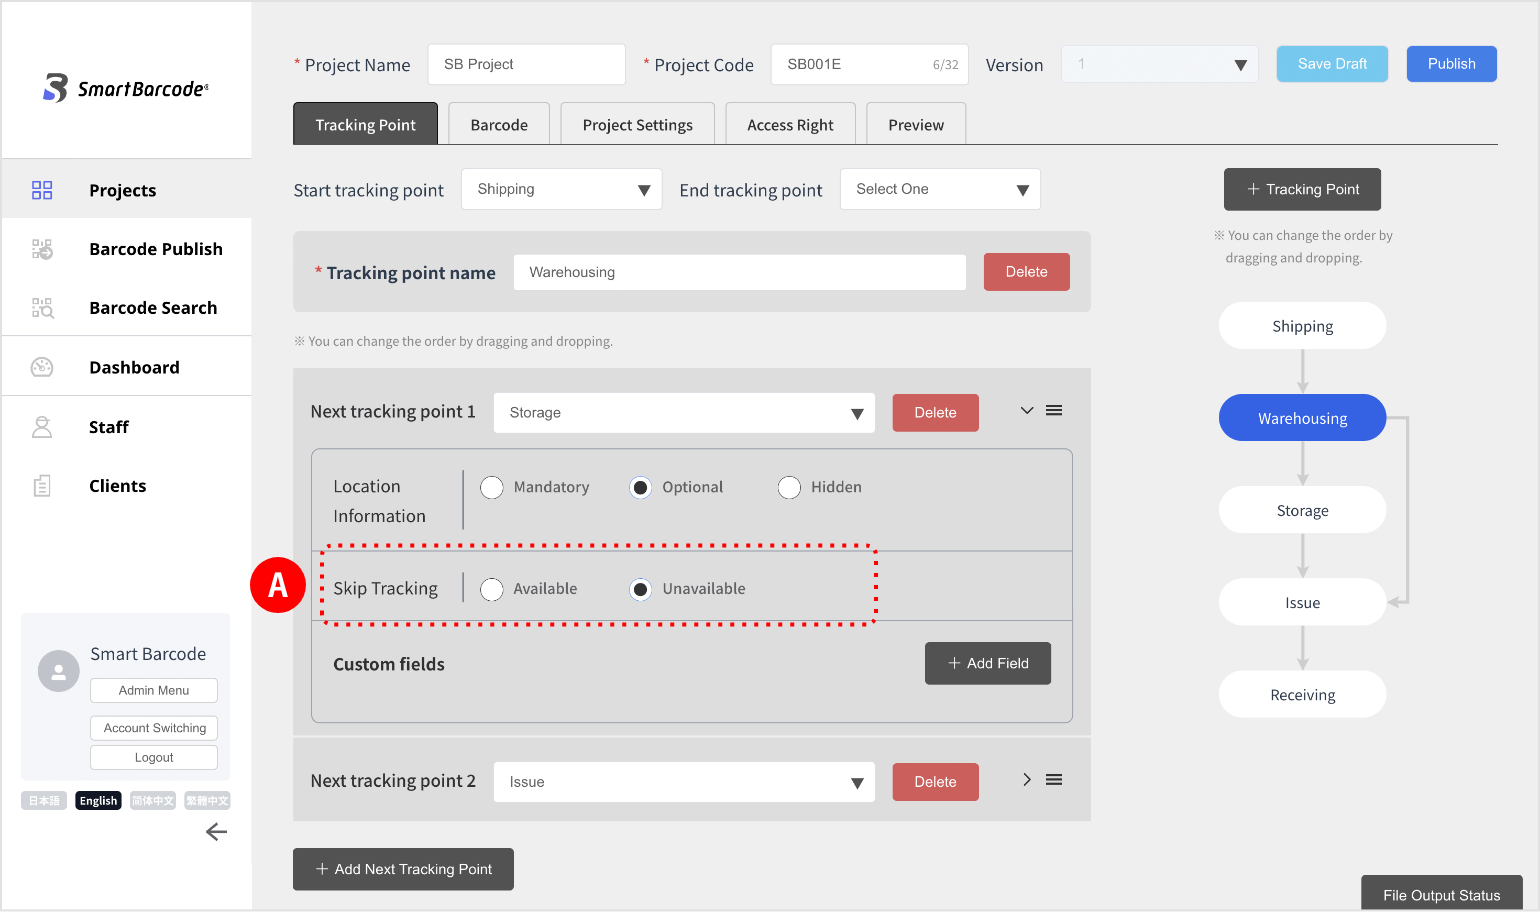
Skip Tracking
You can decide whether a specific tracking point can be skipped.
(1) Select “Allowed” if skipping is permitted, or “Not Allowed” if it cannot be skipped.A
Setting Recorded ItemsA
You can configure multiple recorded items for each tracking point.
(1) Click “+Add Field”.Bto set up items.
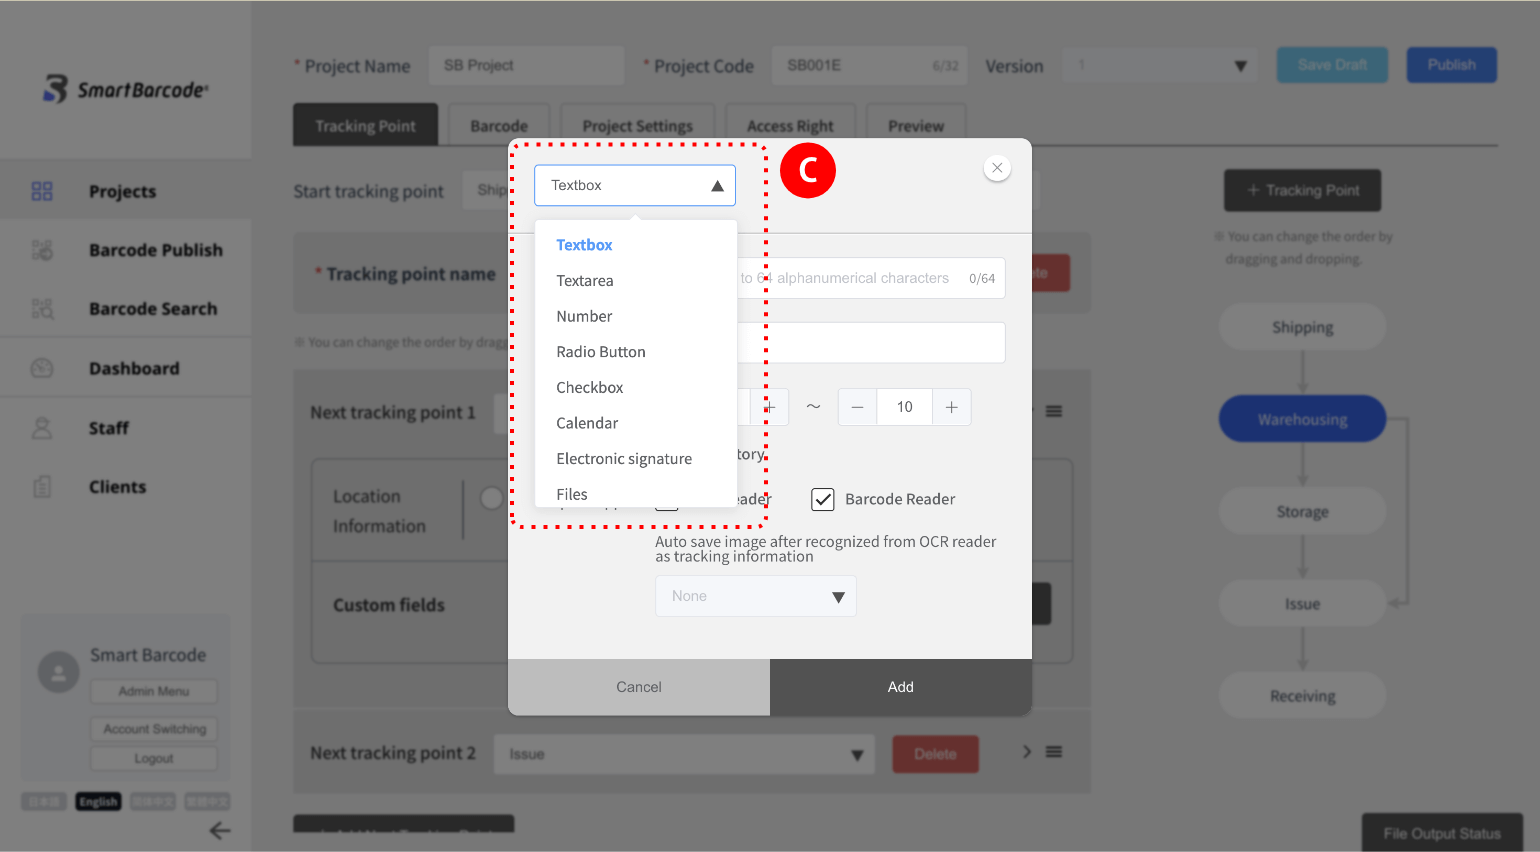
(2) Select and set the type of information to be recorded (described later).C
* Multiple “Items to be recorded” can be set at one tracking point.
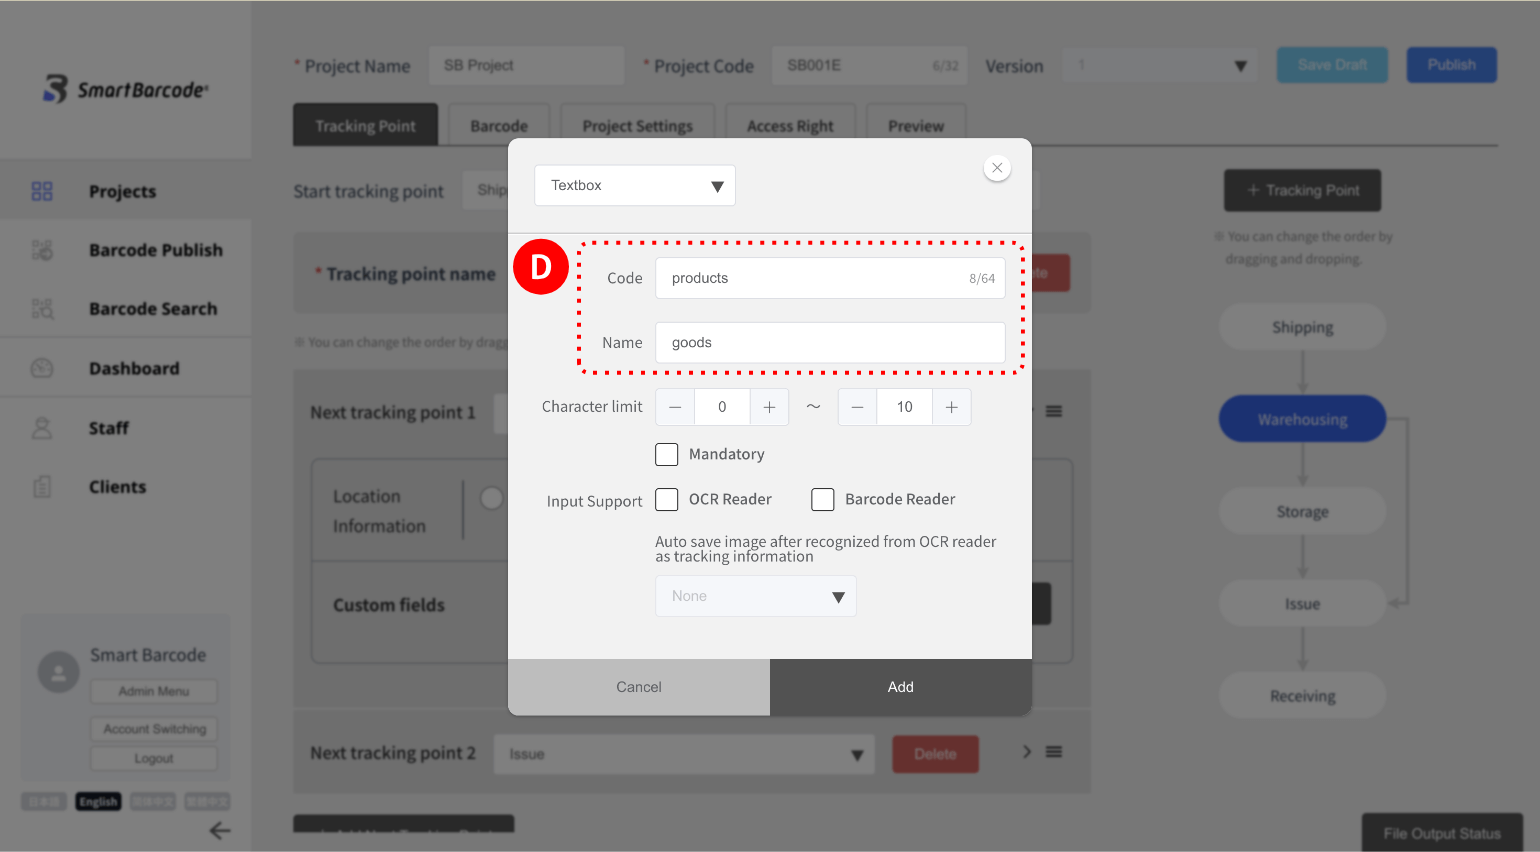
Common Items When “Setting Custom fields”
・Please set “Code*” and “Name” arbitrarily.D

* ・ The code is a management code for the data to be recorded, and the name of the data item at the time of data download, report output, it will be used in the validation settings, so please set the code to be easy to understand.
・The code is alphanumeric only, and spaces cannot be entered.
・The same code cannot be used in one project. (the same name can be used.)
・You can set the input of the information to be recorded to “Required”.
If required, you must enter information before the trace can be completed.

Hints

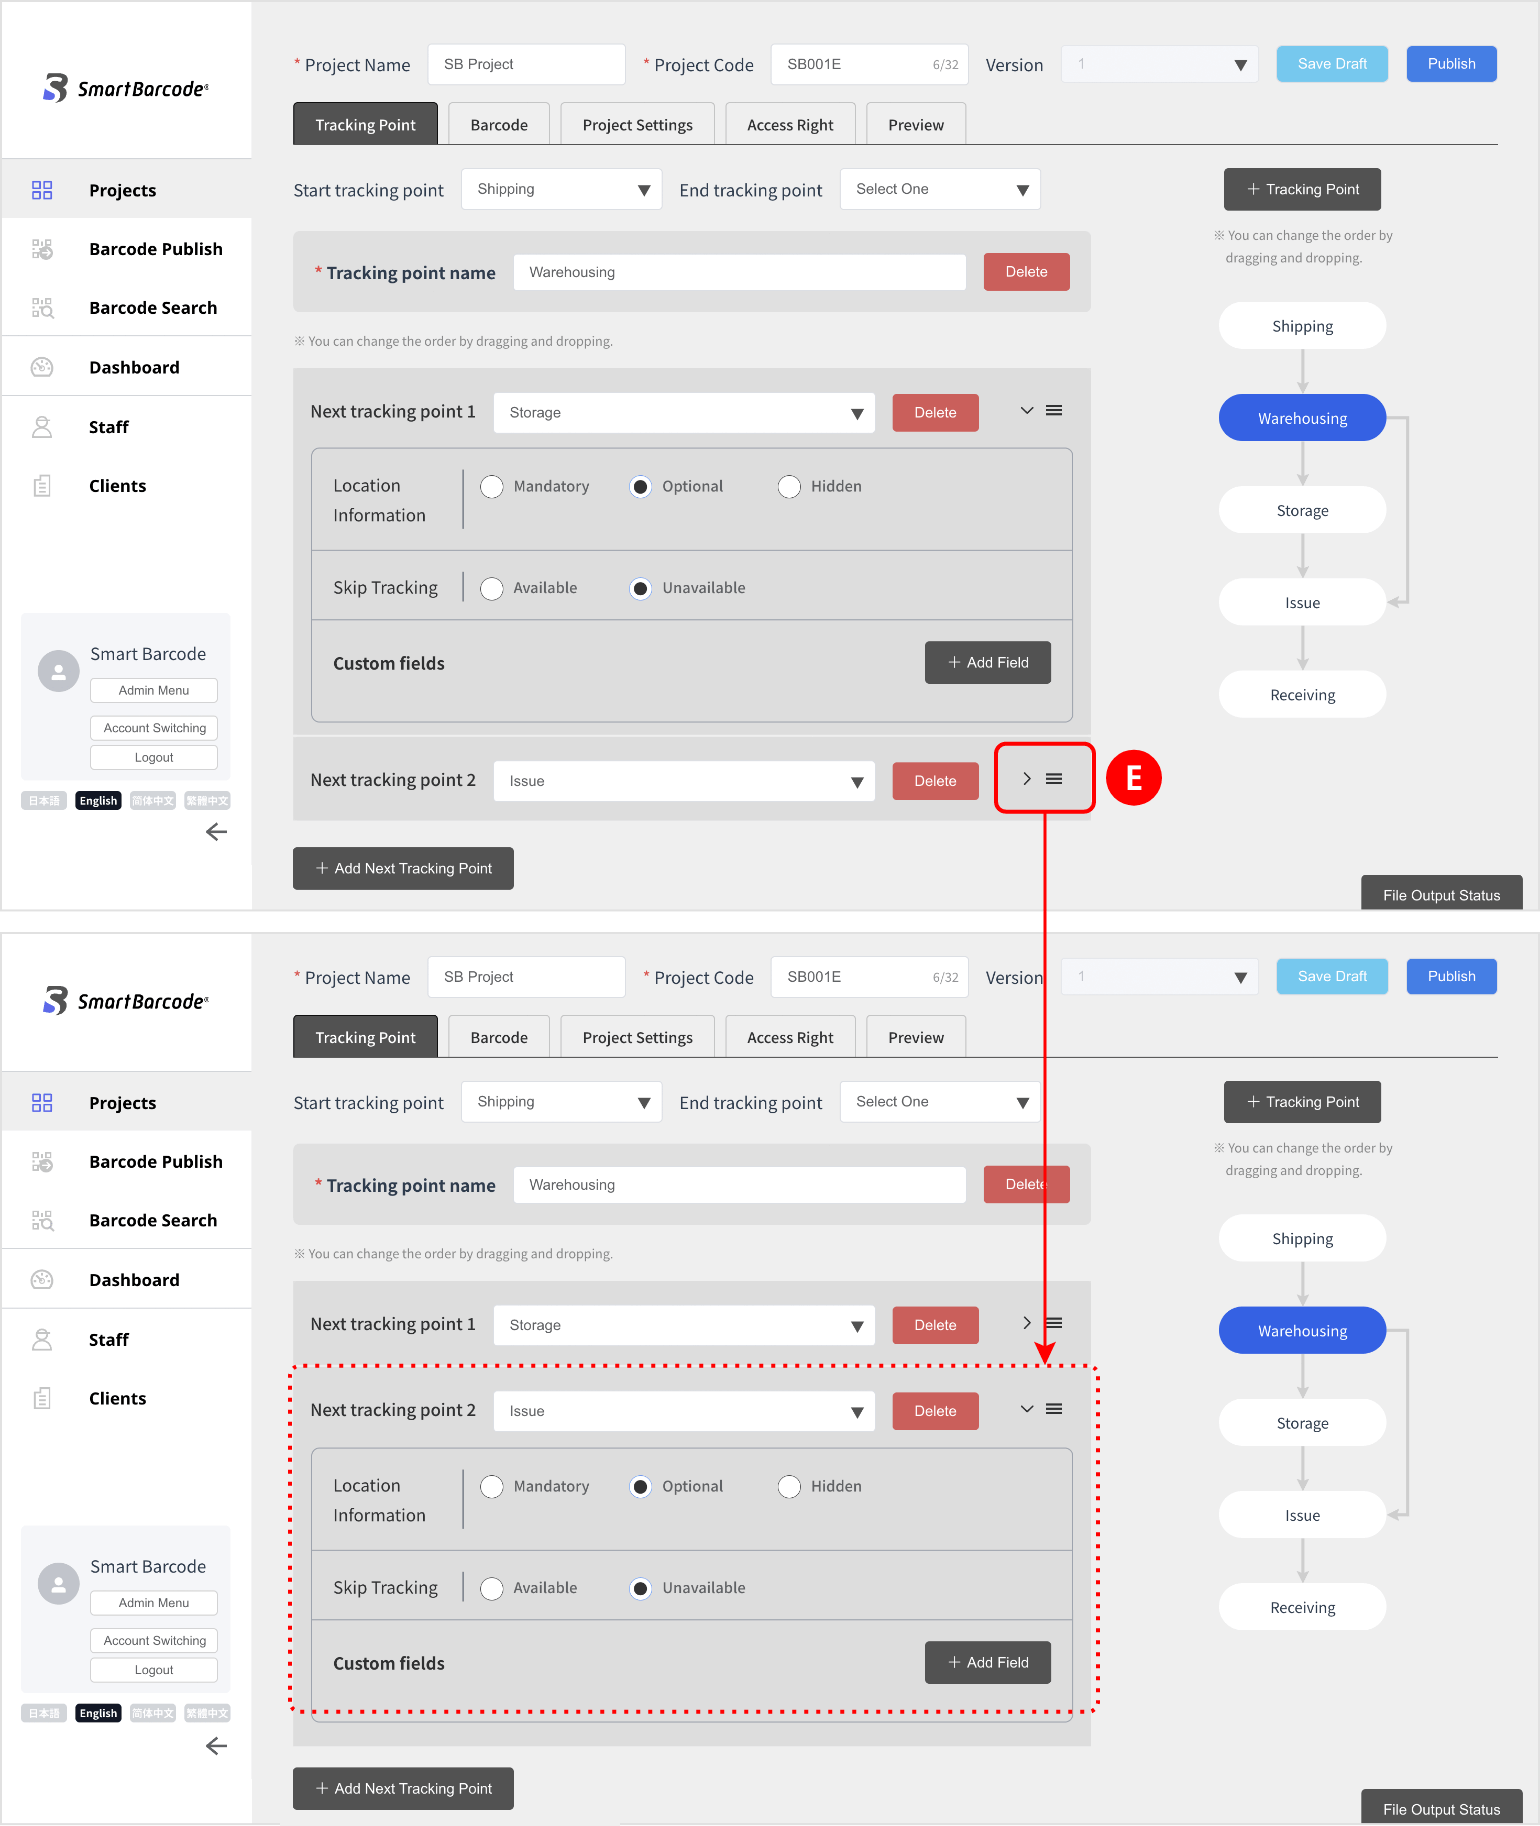
・When selecting a tracking point, be sure to select it from the flowchart on the right side of the screen.
Please note that selecting from “▼” in “next tracking point” will change the “next tracking point”.

If there are branches, expand the accordion menu (>) Eto configure the settings.
The Types Of Custom Fields Are As Follows:
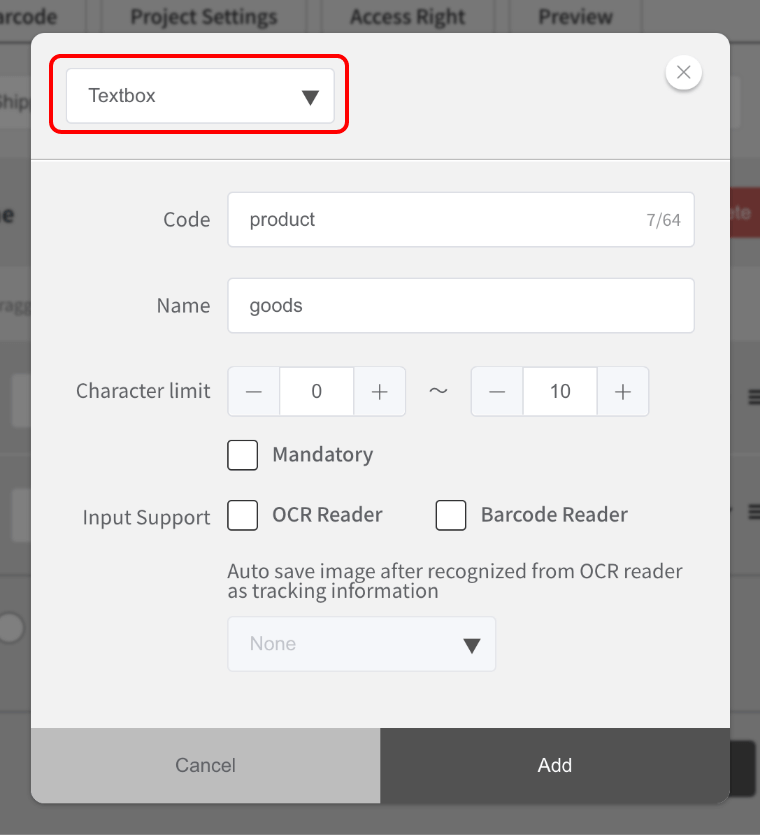
[Text Box]

You can set up a text input field (1 line).
(the input field is displayed on one line.) there is no limit to the number of characters you can enter. )

(1) The input method can be manual input or voice input.
(2) Depending on the input support setting, it can also be performed by reading OCR*1 and barcode*2.
(3) You can also set the automatic saving of images taken with the OCR reader.
(4) Click the add button to complete the setting.

*1: Only alphanumeric characters are supported for input with the OCR reader.
*2: Barcode reader is optional, so please contact us if you want to set it.
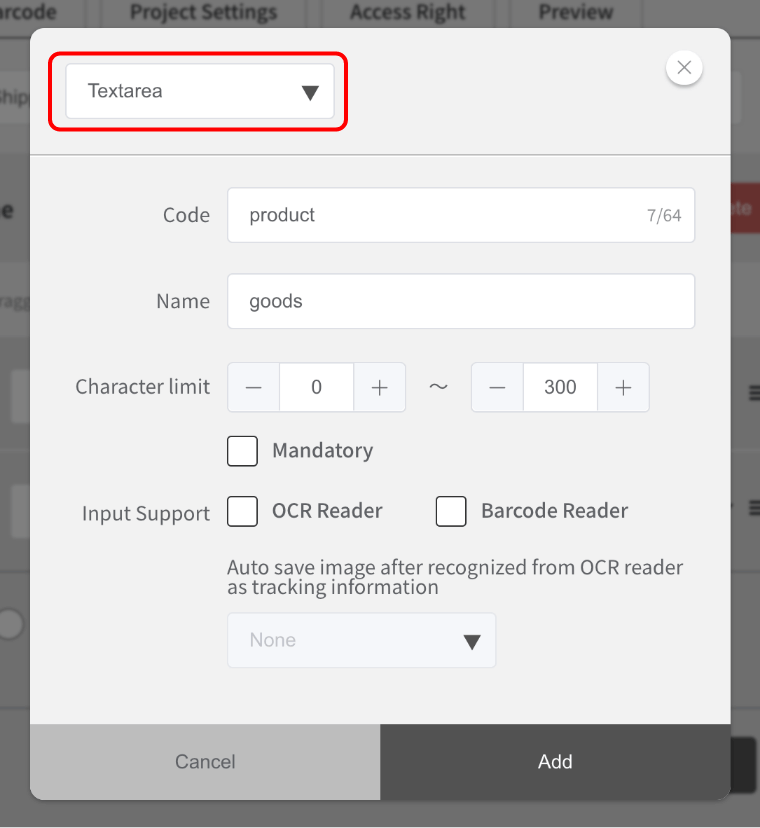
【Text Area】

You can set up a text input field (multiple lines).
*The input field will be displayed on multiple lines. There is no limit to the number of characters you can enter.

(1) The input method can be manual input or voice input.
(2) Depending on the input support setting, it can also be performed by reading OCR*1 and barcode*2.
(3) You can also set the automatic saving of images taken with the OCR reader.
(4) Click the add button to complete the setting.

*1: Only alphanumeric characters are supported for input with the OCR reader.
*2: Barcode reader is optional, so please contact us if you want to set it.

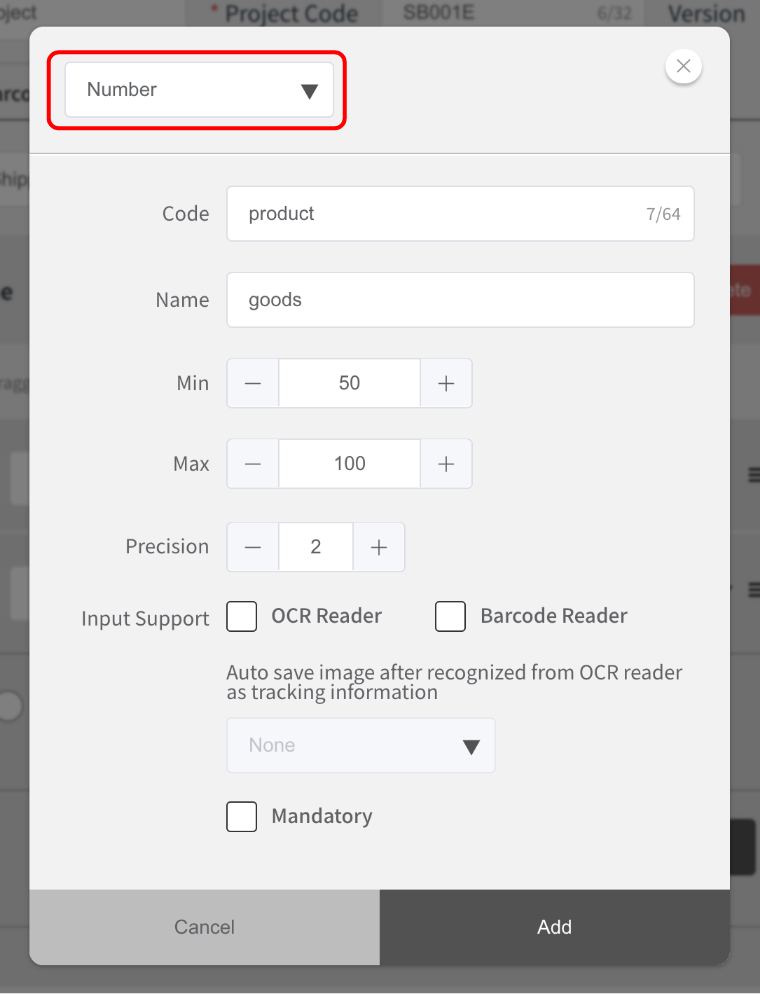
[Number]

You can install a numeric input box.
*suitable for information that you want to display numerically (weight, size, etc.).

(1) The number can be entered with “+-“.
(2) You can set the minimum and maximum values of the input values and the number of decimal places.
(3) The input method is manual input.
(4) Depending on the input support setting, OCR*1 and barcode*2 can also be read.
(5) You can also set the automatic saving of images taken with the OCR reader.
(6) Click the add button to complete the setting.

*1: Only alphanumeric characters are supported for input with the OCRreader.
*2: Barcode reader is optional, so please contact us if you want to set it.

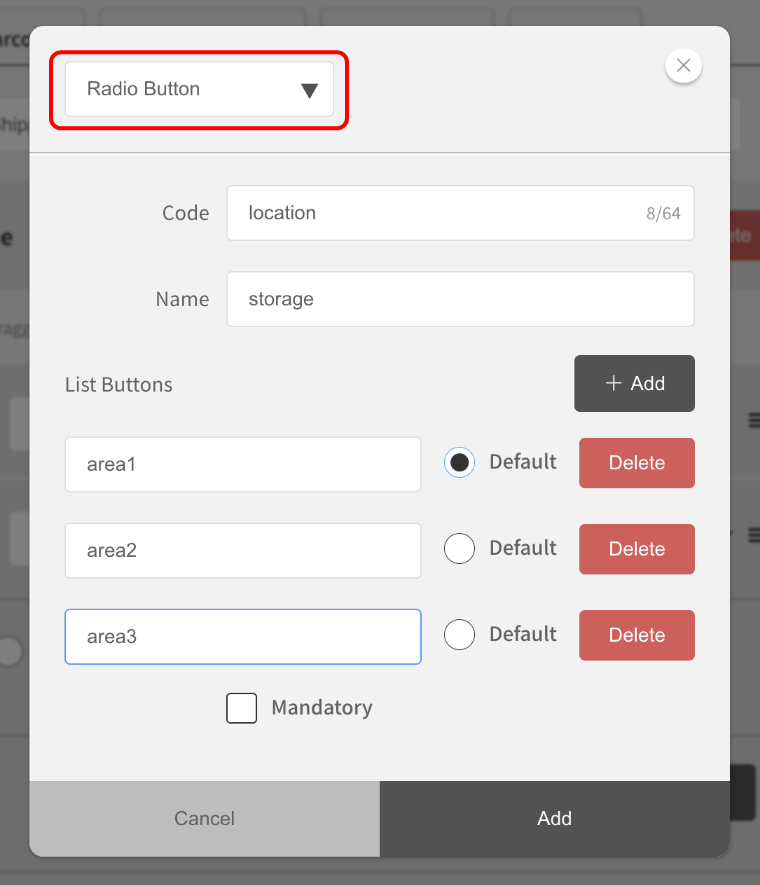
[Radio Button]

You can install a radio button list.
Set to select only one of multiple choices.

(1) Enter the selection items in the button list.
    *You can add a choice with “+Add”.
(2) Set the default settings for the choices.
(3) Click the add button to complete the setting.

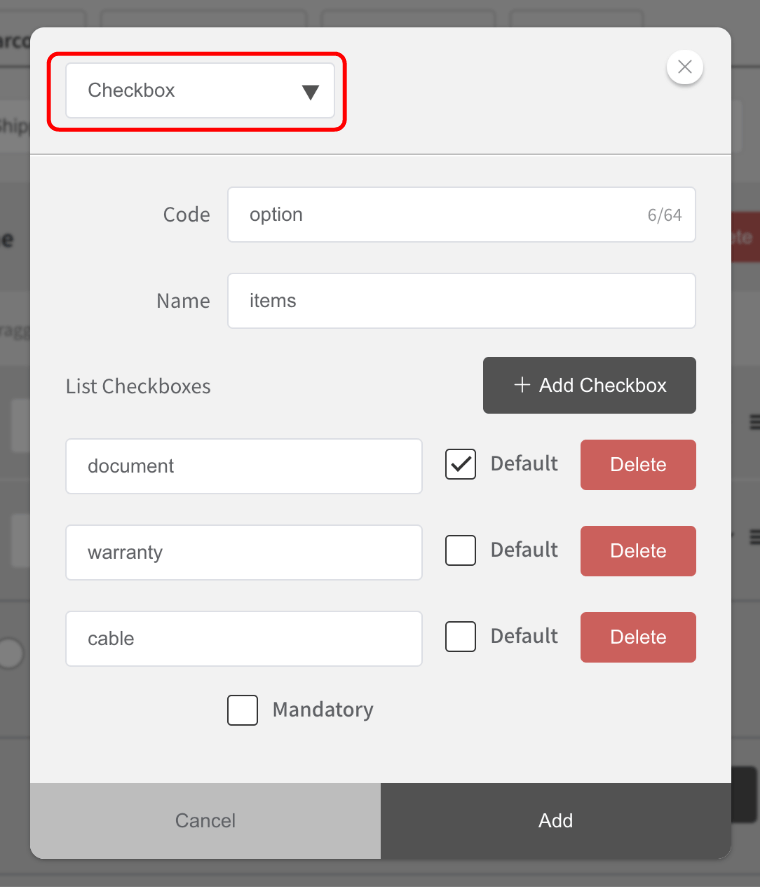
[Check Box]

You can install a check button type list.
Set to select multiple choices from multiple choices.

(1) Enter the selection items in the check box list.
    *you can add a choice with “+Add”.
(2) You can set the default setting (multiple) of choices.
(3) Click the add button to complete the setting.

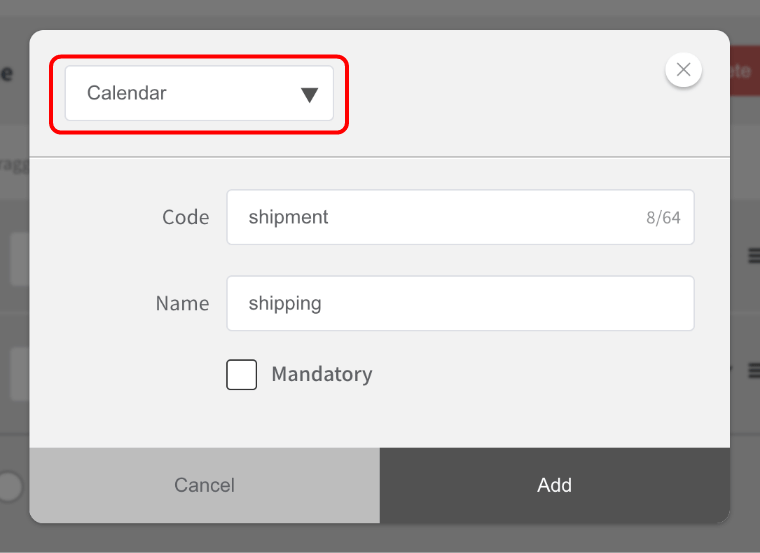
[Calendar]

You can display the calendar and select a date.
It is suitable when date information (such as ship date) is required.

(1) Click the add button to complete the setting.
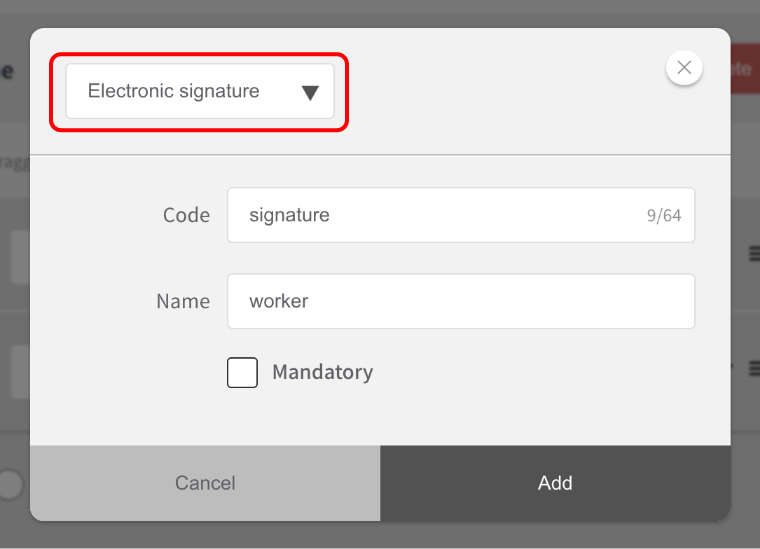
[Electronic Signature]
You can set up an electronic signature line and sign directly on the device.
(1) Click the add button to complete the setting.
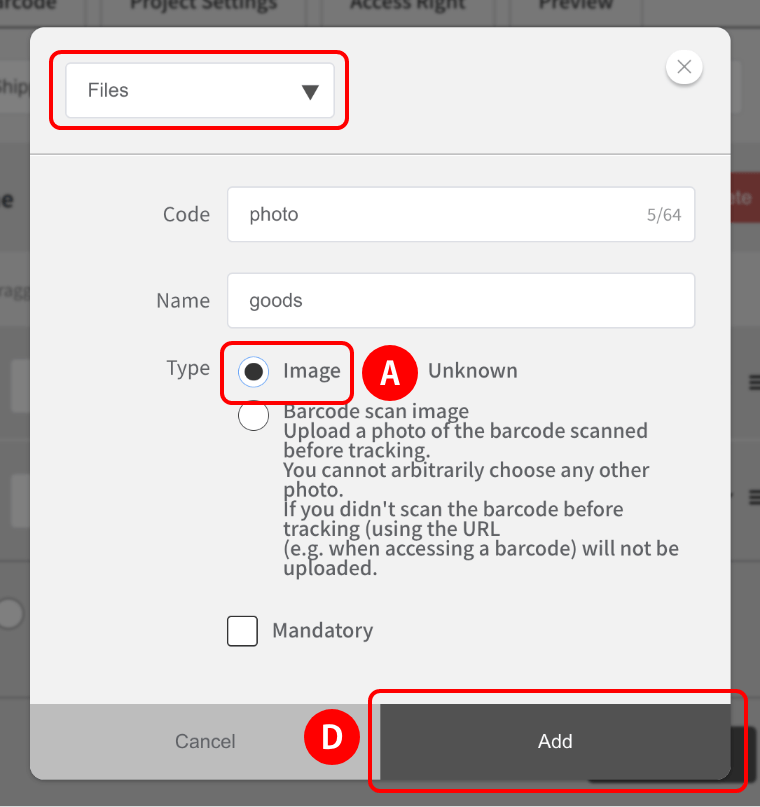
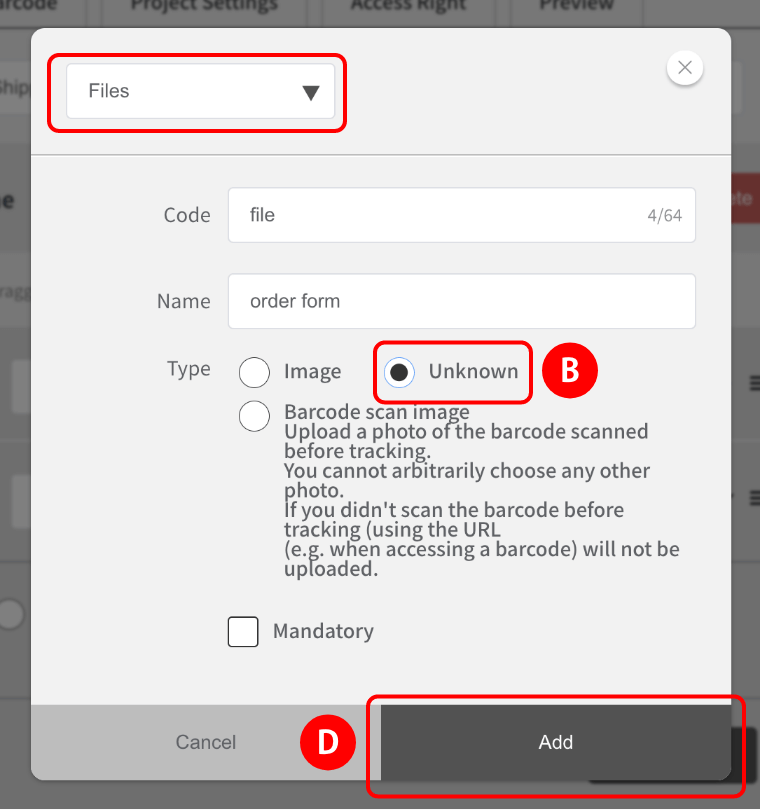
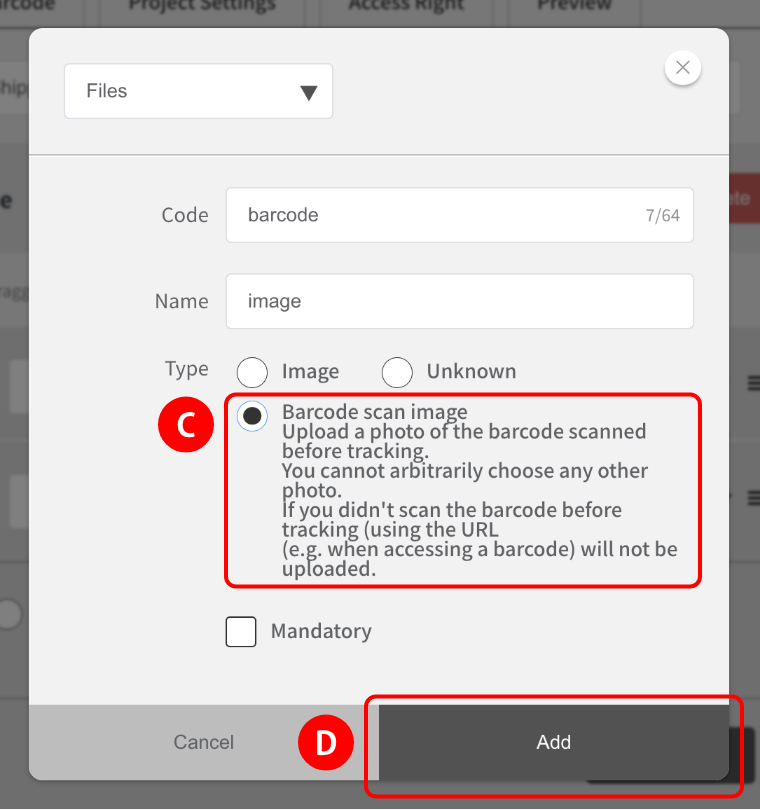
[File]

You can upload images and various files.
*Suitable for recording (attaching) packaging, product information, certificates, etc.

(1) Select “Image”Ato upload a photo.
(2) Select “Unspecified” Bto upload files such as pdf, excel, and word.
(3) Select “Barcode scan image”Cto upload the scanned barcode image.
(4) Click the “Add” button D to complete the settings.

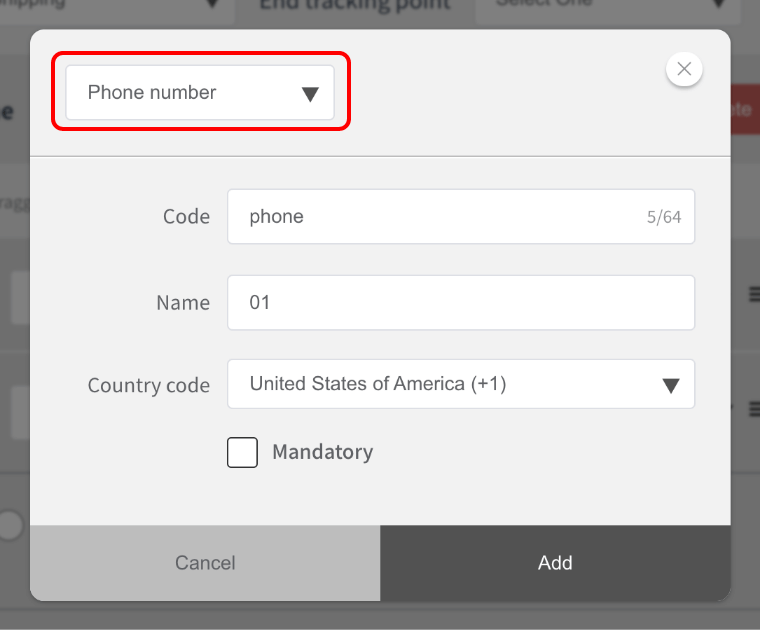
[Phone Number]

You can set up a phone number input field to send sms notifications of recorded information to third parties.
*When you set “Tracking notification” in the “Barcode” tab, you will receive a message by sms.

(1) Select the country code.
(2) Click the add button to complete the setting.

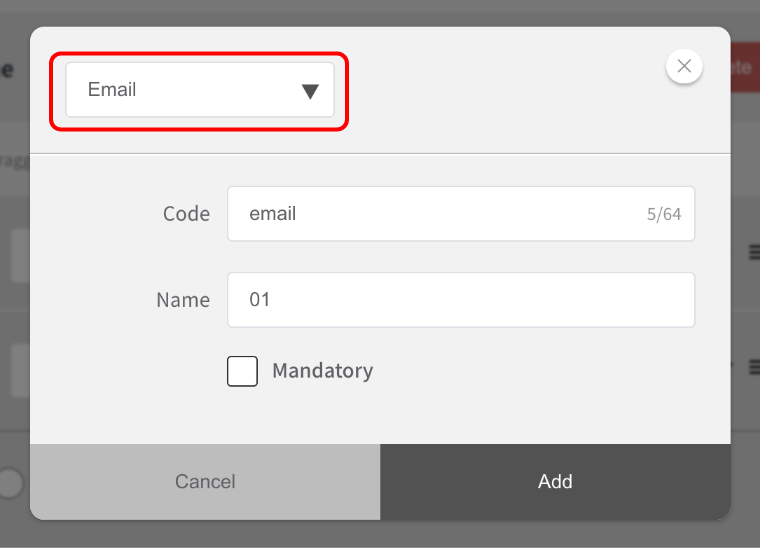
[Email]

You can set up an input field for an email address to notify the recorded information to a third party by e-mail.
*When you set “Tracking notification” in the “Barcode” tab, you will receive a message in the email.

(1) Click the add button to complete the setting.
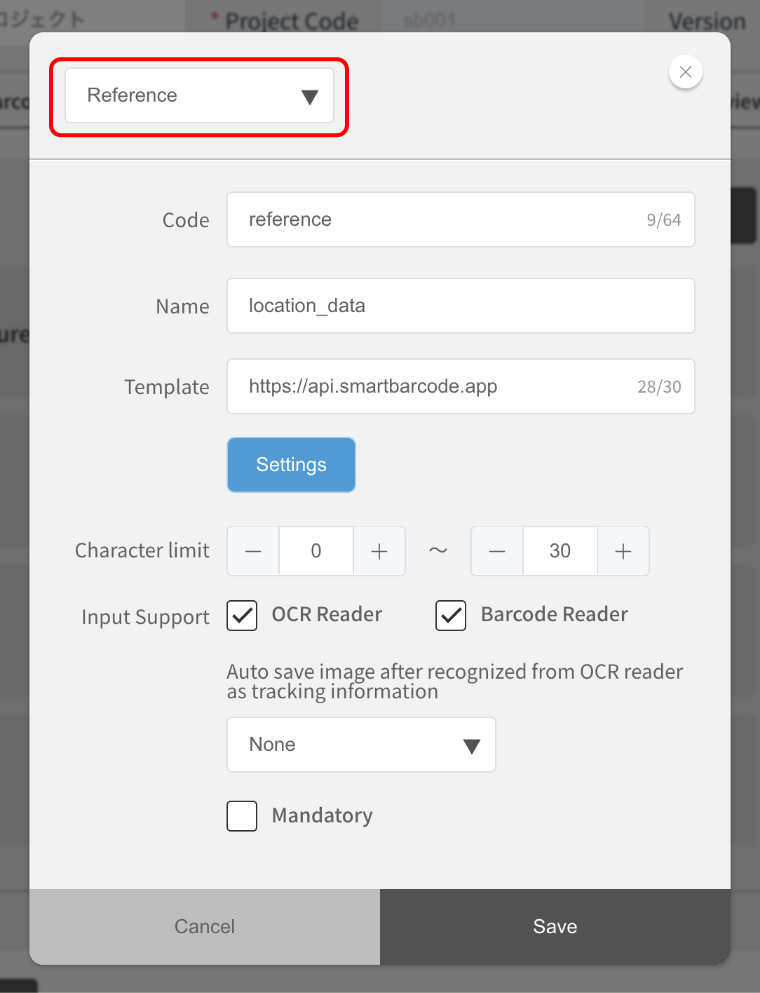
[Reference]
With API integration, you can retrieve necessary information from external sources.


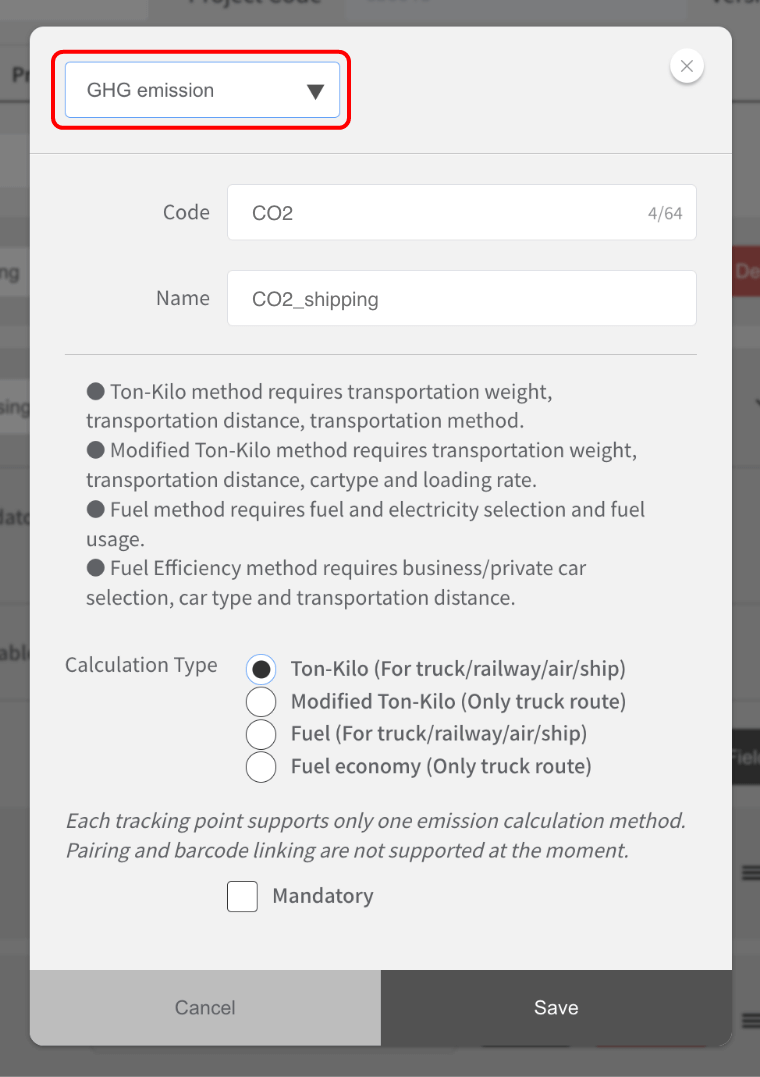
[Greenhouse Gas Emissions] Patent Acquired
You can calculate the greenhouse gas emissions between specified tracking points.
There are four available methods for calculation:
・Traditional Ton-Kilometer Method (Truck/Rail/Air/Ship)
・Improved Ton-Kilometer Method (Truck only)
・Fuel Method (Truck/Rail/Air/Ship) ・Fuel Economy Method (Truck only)


Configuring Exit Tracking Points

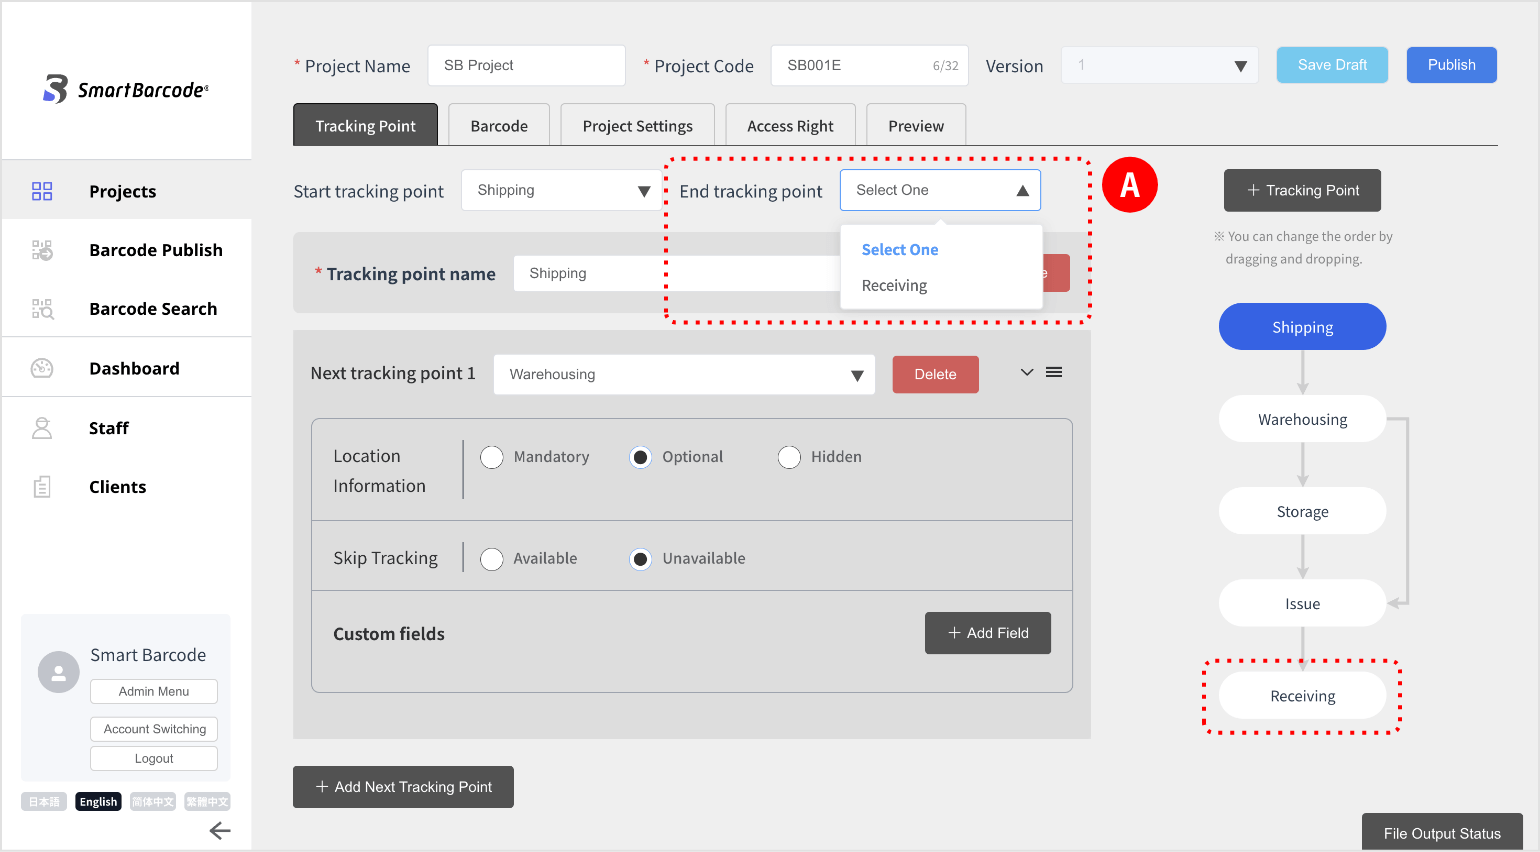
Set the point at which you want to end tracking.
(1) Select the tracking point Ato be terminated and the setting is complete.
© LOZI Inc. All Rights Reserved.